Beginner’s guide: OSSIM Part 2
Hope all of you are keeping well. Thank you
all for the overwhelming support you people are giving me. So today we’ll deal
with everything from basic OSSIM configuration to integrating different types
of assets. Before we jump in to all of that I hope all of you are ready with
installation. If not please visit my previous post, which is actually the first part.
Make sure you have an active internet connection for your
OSSIM. As you all know the Alienvault platform has five modules in
it, which are the Asset discovery, vulnerability assessment, threat detection,
behavioural monitoring and security intelligence. In simple words we add assets
first, and then we’ll configure all those assets under each and every module of
Alienvault respectively. If you're ready with everything mentioned in part 1, we can now move forward with the configurations. Here we’re just considering only OSSIM not USM. For USM you may need a little
more preparation before we start.
This is going to be very long process. For those people who doesn't like reading, I've got a playlist for them.
Full OSSIM Configuration
This is going to be very long process. For those people who doesn't like reading, I've got a playlist for them.
Full OSSIM Configuration
Step:1 Basic Configuration
There are mainly four things that need to be done.
(2) Configuring hostname for OSSIM.
(3) Setting up the correct time zone for the user.
(4) Configuring password
for the configuration backup.
For the first two items you need to either do a ssh into the
system or else can use the VMware console itself. If you’re planning to do a ssh, you can use
the putty (http://www.putty.org/). Use the
IP address of the OSSIM you gave at part 1, with port 22. Your computer mouse
may not work in the console/putty, so you have to rely merely on to the arrows
keys of your keyboard. Hence it becomes easy to use. You can only use your arrow keys to select any of the options in the menu and then hit the
enter key to open it.
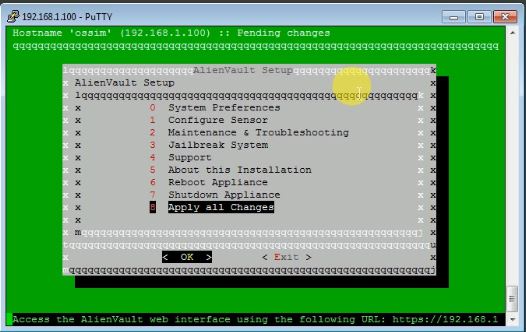
Once you login into the console as root , you’ll be welcomed
with configuration window, as shown in Fig. 1
 |
| Figure 1 |
Select system preferences -> change location-> date
and time ->configure time zone->hit “yes” when you are prompted with a
dialog box
Once you see the following window (Fig.2),
 |
| Figure 2 |
Select you geographic area and hit enter, since my current
location is India, I chose Asia and hit enter. On the following screen select
your nearest city, hit enter again and it’ll take few seconds before it fall
back to our console window. Then navigate back to the system preferences window
Configure hostname -> Type a new hostname -> hit ok,
navigate back to the main Alienvault setup menu(Fig. 3).
 |
| Figure 3 |
Hit Apply all changes -> yes, when all the settings are
applied, reboot the device by using options 6 on the same Alienvault setup menu
(Fig. 4).
 |
| Figure 4 |
Once the device has successfully rebooted, open the web
browser and navigate to the OSSIM IP address using https protocol. The browser
will show a warning describing the connection is not secure. Just accept the
certificate, add an exemption and let it load.
Once it is loaded, login with user account you’ve created
while installation. The username will be admin and use the same password you
entered while configuring the credentials for web UI in part 1.
Once you login navigate to the 'setting' menu at right top
corner.
Change the time zone and then enter your current password,
click save to apply the settings (Fig. 5).
 |
| Figure 5 |
Then navigate to
configuration->administration->main->backup
Scroll down to see “Password to encrypt backup files”, put a
password next to it, scroll up click on update configuration.
So to summarize, you have three credentials with you right now,
one for the console (root:password) another one for webui(admin:password) and
third one for the encryption of backup file(password)
Here is small video on my YouTube channel on how to do all
of these.
Step:2 Adding assets & Configuring VA
Anything which has an IP address can be called as an asset.
Your assets from mobile device to servers and IP cameras to network printers
can be added to OSSIM. For demonstration I’ll only add a few. To add assets
first you need to login to web UI as an admin, then navigate to
Environment->assets & groups->add assets
There are 4 ways to add assets; I’m using the 4th
method ‘Scan for new assets’, which will be faster and easier to start with
adding assets(Fig. 6).
 |
| Figure 6 |
A new window will appear in which you can select your
network from the list or add it by yourself (Fig. 7).
 |
| Figure 7 |
Leave everything else to the default, and hit start scan. It
might take a while to complete. Please be patient. Once scanning is complete.
You will be on the same window, with the results under the “start scan” button
(Fig. 8)
 |
| Figure 8 |
Click on “update managed assets”, leave everything to
default unit it saves the results (Fig. 9)
 |
| Figure 9 |
Now it is time to edit our assets. It is mandatory that we
teach OSSIM, what actually our asset's are. For that navigate back to
Environment->assets & groups. On list of assets, click on the lens icon on right hand side
of the asset you want to edit (Fig. 10).
 |
Figure 10
|
A new window appears, click on actions->edit on the right
top corner(Fig. 11)
 |
| Figure 11 |
On the popup box that appears set your device name and also
the device type and hit save. You can see my asset details has been updated (Fig.
12)
 |
| Figure 12 |
Repeat the process for all your assets.
Vulnerability Assessment
Next we’ll configure the vulnerability engine in OSSIM.
Navigate to Environment->vulnerabilities
If you’re planning to go for an authenticated scan, click on
settings, create your profile for credentials (Fig.13). If not, just skip this
step
 |
| Figure 13 |
Then navigate back to Environment->vulnerabilities->scan
jobs->new scan job.
A new window appears. In that Job name is just a name, give a name -> If you’ve configured a
password profile, then select on advanced click on ssh or smb credentials or else just add your asset or network to be
scanned and click save to start scan(Fig.14)
 |
| Figure 14 |
Asset Descoverry and Vulnerability Scanning
Step:3 Configuring IDS
Setting up HIDS
Configuring HIDS is out next task. It is very easy deploying
HIDS in windows servers but, it is bit tricky while deploying it on Linux
servers. First we need to do some
configuration in the OSSIM. For that navigate to
Environment->Detection->add agent, on the popup window, fill up your asset
details and click save(Fig.15).
 |
Figure 15
|
Repeat the process to add all the servers you want to
integrate. Here I’ve added a Linux server first. Now we have to download the
OSSEC agent from
Download the latest stable “Server/Agent unix” and copy it
to your Linux server. Now you need to have root account in Linux server in
order to run the installer smoothly.
Once you login as root, copy the installer to linux machine, decompress the installer; use the
following command
#tar –xvf
ossec-hids-2.8.3.tar.gz (or whatever version version, with full path of
the file you’ve copied to linux server)
Now open the decompressed folder and install the agent
#cd ossec-hids-2.8.3
#./install.sh
#./install.sh
The very first thing it will ask for is the language for
installer, by default “EN” is selected hit enter to continue
Then the first question will
be the kind of
installation we want, type in agent and hit enter (Fig.16)
 |
| Figure 16 |
Set
everything to default except for question 3, OSSEC HIDS server IP will be your
OSSIM’s log collector IP(Fig 17)
 |
| Figure 17 |
At the end it will ask again to hit enter to close the installer(Fig
18).
 |
| Figure 18 |
Once you’ve installed the agent, we’ve to configure it or in
simple word we need to connect our agent with our OSSIM. For that type in the
following command in linux machine and hit enter
#/var/ossec/bin/manage_agents
And Type “I” to import keys. (Fig.19)
 |
| Figure 19 |
 |
| Figure 20 |
Keys will be shown as a popup. Copy the entire key, in my
case, starting from MDAx to ZGI= (Fig.21)
| Figure 21 |
And paste it on to the terminal of linux machine. Hit enter to
continue, check the agent information shown matches with the asset we’re trying
to integrate and type in Y then hit enter to confirm.(Fig.22)
 |
| Figure 22 |
Now you can type in Q to quit from the manage agents window.
Then we have to restart the HIDS in Linux for that
#/var/ossec/bin/ossec-control restart
And hit enter (Figure 23)
 |
| Figure 23 |
To deploy agent in any windows machine, navigate to right
corner of that particular asset in agent information tab and click download for
preconfigured agent. You can also choose auto deployment option next to it, if
you want a remote deployment. (Fig.24)
 |
| Figure 24 |
Once downloaded, copy it to the windows server and simply
double click it to install. Since it is a preconfigured agent you don’t need to
change or edit anything. You can see OSSEC Manager in under "start menu" in windows(Fig 25)
 |
| Figure 25 |
Now we need to restart the HIDS server module in OSSIM.
Navigate to Environment->Detection->HIDS Control-> HIDS service
restart(Fig.26)
 |
| Figure 26 |
Once restarted navigate back to Environment->Detection
and check the status. It should be active.(Fig 27)
 |
| Figure 27 |
Seting up NIDS
You can ask OSSIM to monitor traffic coming into interfaces.
By default two interfaces will be enabled. If you want to change those, login
into console of OSSIM then go to
Configure sensor->configure network monitoring
I don’t want NIDS to
monitor my management interface(Eth0); instead I want it to monitor log
collecting and the span interface (Fig.28).
You need to apply the changes before exiting the console.
 |
| Figure 28 |
Configuring HIDS
Step:4 Adding devices
Next we’re going to integrate devices that send syslogs. So
first ask your network admin to forward syslogs towards UDP port 514 of the log
collector IP of OSSIM. Then use putty and then SSH into the OSSIM management
interface. Once logged in select "jailbreak system" and hit enter.
The OSSIM receives log at its log collector interface. The logs are then saved into /var/log/syslog file in the OSSIM. When you have
more devices sending logs, the OSSIM will have some trouble to extract these
logs from the syslog file and process it. So in order to make it simple for OSSIM, we create a rsyslog filter which actually moves the device logs into a
different file rather than putting all of it together in deafult OSSIM syslog file.
From the console
navigate to the folder /etc/rsyslog.d and list the files in it. If you have
your device name among the *.conf files, then you don’t need to create a syslog
filter for that particular asset. Then you can jump to "enabling Plugin" section . if not, use nano or vim editor to create a
file. I’m writing down a syslog filter
below for my Sophos utm.
#nano /etc/ryslog.d/sophos.conf
If ($fromhost-ip
== ’10.10.10.1’) then
/var/log/sophos-utm.log
&~
&~
Hit ctrl+o to save and ctrl+x to exit from nano editor
10.10.10.1 is the IP address of my Sophos-utm sending logs to our OSSIM.
Configure sensor -> Configure data source plugin ->
Enabling Plugins
Type ossim-setup to start the console UI again.Configure sensor -> Configure data source plugin ->
Select all the device plugins you need enable and select ok,
navigate back to main menu and apply all changes. (Fig.29, Fig.30)
 |
| Figure 29 |
 |
| Figure 30 |
Open your web ui navigate to
Analysis->siem select data source as your device check whether you’re seeing
logs as shown below(Fig.31, Fig.32).
 |
| Figure 31 |
 |
| Figure 32 |
Configuring log sources
Step5: Availability Monitoring
The last option to enable in OSSIM will be the Availability
monitoring. As the word means, it simply checks whether the resource/service is
available or not. Say for an example, I
can ask host availability monitoring to check whether my firewall is up or not.
Same way I can ask service availability monitoring to check whether my apache service
in a particular server is running or not.
Service availability monitoring
Here, we’ll ask OSSIM to check whether a port of particular
server is UP or DOWN for demonstration purpose, I’m going to ask OSSIM to
monitor my IIS service on one of my test server.
Navigate to Environment-> Assets & groups and click on lens button of the asset on the right hand side. (Fig.33)
Navigate to Environment-> Assets & groups and click on lens button of the asset on the right hand side. (Fig.33)
 |
| Figure 33 |
You’ll be taken to asset details page. There you’ll see a
services tab, click on it. (Fig.34)
 |
| Figure 34 |
If you scroll down a little bit you’ll see edit services
under the services tab. Click on edit services. (Fig.35)
 |
| Figure 35 |
You’ll have a new popup in which you can enable/disable the
services to be monitored. It also help you to add a port/service manually, if
not identified by OSSIM. (Fig.36)
 |
| Figure 36 |
Host Availability Monitoring
We can use this feature to check if a device like firewall or
router is UP or NOT. For demonstration, I’m going to ask OSSIM to monitor my
SOPHOS-UTM. For that, just like before I’ve opened the asset detail window,
Instead of editing the services, we have to click on the Actions button on
right top corner and click on Enable Availability Monitoring (Fig.37).
 |
| Figure 37 |
 |
| Figure 38 |
You can also navigate to Environment -> Availability to
see further details. There are lots of options including reporting which may
come handy in future. Please feel free to explore yourself(Fig.39).
 |
| Figure 39 |
Environment Snapshot
The Environment snap is a small hidden window, in which you
can see the current status of your SIEM . No matter in which page you are, you
can see a small arrow on the right–center of the page(Fig.40).
 |
| Figure 40 |
Once you click on it, you will see a window slide from right, which will have details
like open tickets, system health, current EPS and monitored devices (Fig.41).
 |
| Figure 41 |
Now you are good to start SIEM/LOG Analysis. It is not an
easy task to set it up. But if you’ve done it properly, its worthy .If you’re
stuck at some point feel free to post your queries in comments. People, who are
planning for Alienvault USM deployment, definitely need to take some
professional support. There are lots of things to be done before we even start
the USM deployment. Everything, starting from EPS to log retention need to be
computed.
People at TripleHat Security Lab LLP can provide support for setting up USM. If interested you can contact them on info@thslab.com.

Thanks!
ReplyDeletePassive Networking
Nice blog Thank you.
ReplyDeletePassive Networking
Structured Cabling
structured cabling companies
structured cabling solutions
It was a perfect guide for all beginners and provide complete details on siem SOC. Thanks for sharing
ReplyDeleteWhy are you monitoring the log collection interface? This doesn't make any sense to me.
ReplyDeleteGreat post. It was a good read about the soc operation. Here IARM Top Cyber Security Company in Chennai provides information security services to enterprises, small & large scale organizations, Manufacturers, finance, Retails, IT/ITES and so on.
ReplyDeleteInformation Security Company in Chennai
Penetration Testing Company In Chennai
Soc Services In India
Cyber Attack Recovery Services In India
SOC2 Auditing Company in chennai
Nice post, impressive. It’s quite different from other posts. Thanks to share valuable post.
ReplyDeleteHow to Find the IP Address of a Printer? - Easy Guide
Beautiful post, awesome. It is very unlike other posts. Thanks to the valuable contribution...
ReplyDeletesecurity operation center
Stickman Party Mod Apk
ReplyDeleteCookie Run Kingdom mod apk
Thursday Dating App
Choices Mod Apk
My response on my own website. Appreciation is a wonderful thing...thanks for sharing keep it up. PUSH Video Wallpaper Crack
ReplyDeleteVray Crack
Stellar Toolkit for Data Recovery Crack
Maltego Crack
Starus Data Restore Pack Crack
Wondershare TunesGo Crack
CyberLink Power2Go Platinum Crack
I am happy after visited this site. It contains valuable data for the guests. Much thanks to you!
ReplyDeleteCrack Download
DUMO Pro Crack Mac
3uTools Crack
Wireshark Crack Mac
Maxon Cinema 4D Studio Crack
Technological advancement still faces some issues regarding software hacking or bug to overcome this discrepancy an increasingly wide variety of application security testing tools are available, but IT executives, programmers, and technicians could find it challenging to determine which technologies solve which vulnerabilities.
ReplyDeleteNurses in Australia receive competitive salaries that reflect their expertise and responsibilities. Entry-level registered nurses can expect to earn between AUD 65,000 and AUD 75,000 annually. As they gain experience and pursue further qualifications, many nurses advance into specialized or managerial roles, potentially earning upwards of AUD 90,000 each year. Various factors influence salary levels, including geographic location, the type of healthcare facility, and nursing specialties. Additionally, nurses often benefit from allowances for housing, professional development opportunities, and comprehensive healthcare coverage. The focus on work-life balance within the Australian healthcare system also enhances overall job satisfaction. As the demand for nursing professionals remains robust, pay rates are anticipated to stay competitive, ensuring nurses are rewarded for their critical contributions to patient care. Overall, nursing offers a financially viable and fulfilling career path in Australia.
ReplyDeletehttps://www.dynamichealthstaff.com/how-much-do-nurses-get-paid-in-australia
Edinburgh Removals Company is your premier choice for reliable and efficient moving services in the heart of Scotland. We specialize in both residential and commercial relocations, ensuring a smooth transition tailored to your specific needs. Our experienced team takes care of every detail, from careful packing and loading to secure transportation and unpacking. With a modern fleet of well-equipped vehicles, we prioritize the safety of your belongings throughout the journey. We are committed to outstanding customer service, working closely with you to create a personalized moving plan. Our transparent pricing means no hidden fees, allowing you to budget with confidence. Trust us to make your moving experience hassle-free and efficient. Contact us today for a free, no-obligation quote!
ReplyDeletehttps://eh1-edinburghremovals.co.uk/
Excellent content, Shaun! Your deep dives into audit practices and cybersecurity frameworks are always insightful. It’s great to see how you're helping professionals stay ahead of evolving compliance demands. I’ve also been exploring similar topics and sharing practical strategies on my own site—feel free to take a look at Shaun Stoltz for more perspectives. Keep up the great work!
ReplyDeleteThis guide does a great job breaking down OSSIM setup for beginners, from asset discovery to IDS, logging, and availability monitoring. Clear steps like these make complex security tools much easier to adopt. Strengthening environments with expert support and reliable security services ensures safer, more resilient operations.
ReplyDelete